コマンドライン・インタフェース Command Line Interface
Flaskをインストールすると、Clickのコマンドライン・インタフェースである、flaskスクリプトをvirtualenvの中にインストールします。端末から実行されたとき、このスクリプトは組み込みの、Flask拡張の、およびアプリケーションで定義したコマンドへアクセスできるようにします。--helpオプションは、どのコマンドおよびオプションに関してもさらなる情報を与えます。
Installing Flask installs the ``flask`` script, a `Click`_ command line interface, in your virtualenv. Executed from the terminal, this script gives access to built-in, extension, and application-defined commands. The ``--help`` option will give more information about any commands and options.
アプリケーションの発見(Application Discovery) Application Discovery
flaskコマンドはあなたのアプリケーションではなくFlaskによってインストールされます; flaskコマンドがあなたのアプリケーションを使用するためには、アプリケーションがどこにあるかを伝える必要があります。アプリケーションをどのように読み込むかを指定するために--appオプションが使用されます。
The ``flask`` command is installed by Flask, not your application; it must be told where to find your application in order to use it. The ``--app`` option is used to specify how to load the application.
--appはアプリケーションを指定するための様々なオプションをサポートしていますが、殆どの使用状況はシンプルなものでしょう。典型的な値は以下のとおりです:
While ``--app`` supports a variety of options for specifying your application, most use cases should be simple. Here are the typical values:
- (何もなし) (nothing)
「app」または「wsgi」という名前が(「.py」ファイル、もしくはパッケージとして)importされ、自動的にアプリ(
appもしくはapplication)またはfactory(create_appもしくはmake_app)が見つけ出されます。 The name "app" or "wsgi" is imported (as a ".py" file, or package), automatically detecting an app (``app`` or ``application``) or factory (``create_app`` or ``make_app``).--app hello指定した名前(訳注: 上の例では「hello」にあたる部分)がimportされ、自動的にアプリ(
appもしくはapplication)またはfactory(create_appもしくはmake_app)が見つけ出されます。 The given name is imported, automatically detecting an app (``app`` or ``application``) or factory (``create_app`` or ``make_app``).
--appは3つの部分からなります: 必須ではない、そのときの作業ディレクトリ(current working directory)を設定するパスと、Pythonファイルまたはdotを使って示されたimportパス(dotted import path)と、必須ではない、インスタンスまたはfactoryの変数名です。もしその名前がfactoryの場合は、必要に応じてカッコ内で囲んだ引数を後ろにつけることができます。以下に示す値は、これらの3つの部分のデモになります:
``--app`` has three parts: an optional path that sets the current working directory, a Python file or dotted import path, and an optional variable name of the instance or factory. If the name is a factory, it can optionally be followed by arguments in parentheses. The following values demonstrate these parts:
--app src/helloそのときの作業ディレクトリ(current working directory)を
srcに設定してからhelloをimportします。 Sets the current working directory to ``src`` then imports ``hello``.--app hello.webパス
hello.webをimportします。 Imports the path ``hello.web``.--app hello:app2helloの中のFlaskインスタンスapp2を使用します。 Uses the ``app2`` Flask instance in ``hello``.--app 'hello:create_app("dev")'helloの中にあるfactoryのcreate_appを、文字列'dev'を引数に使って呼び出します。 The ``create_app`` factory in ``hello`` is called with the string ``'dev'`` as the argument.
もし--appが設定されていない場合、flaskコマンドは「app」または「wsgi」を(「.py」ファイルとして、またはパッケージとして)importしようとし、そしてアプリケーションのインスタンスまたはfactoryを見つけ出そうとします。
If ``--app`` is not set, the command will try to import "app" or "wsgi" (as a ".py" file, or package) and try to detect an application instance or factory.
与えられたimportの中で、flaskコマンドはappまたはapplicationという名前のアプリケーションのインスタンスを探し、それからそれ以外の名前も含めたあらゆるアプリケーションのインスタンスを探します。もしインスタンスが見つからなかった場合、flaskコマンドはcreate_appまたはmake_appという名前の、インスタンスを返すfactory関数を探します。
Within the given import, the command looks for an application instance named ``app`` or ``application``, then any application instance. If no instance is found, the command looks for a factory function named ``create_app`` or ``make_app`` that returns an instance.
もしfactoryの名前の後にカッコが続いたときは、カッコの中の内容はPythonのリテラルとして解析され、引数またはキーワード引数としてfactory関数に渡されます。これは、(カッコの中では)文字列はまだ引用符内部にしておく必要があることを意味します。 If parentheses follow the factory name, their contents are parsed as Python literals and passed as arguments and keyword arguments to the function. This means that strings must still be in quotes.
開発用サーバの実行 Run the Development Server
runコマンドは開発用サーバを開始します。runコマンドは殆どのケースで、Flask.run()メソッドの代わりになります。:
The :func:`run <cli.run_command>` command will start the development server. It replaces the :meth:`Flask.run` method in most cases. ::
$ flask --app hello run
 * Serving Flask app "hello"
 * Running on http://127.0.0.1:5000/ (Press CTRL+C to quit)
警告
本番環境ではアプリケーションを走らせるためにこのコマンドを使わないでください。開発中だけ開発用サーバを使用してください。開発用サーバは便宜のために提供されていますが、安全、安定、効率的であるようには特に設計されていません。本番環境でどうやって実行するかについては本番環境への展開(Deployment to Production)を確認してください。 Do not use this command to run your application in production. Only use the development server during development. The development server is provided for convenience, but is not designed to be particularly secure, stable, or efficient. See :doc:`/deploying/index` for how to run in production.
もし他のプログラムが既に5000番ポートを使用中であるときは、サーバを開始しようと試みたときにOSError: [Errno 98]またはOSError: [WinError 10013]を見ることになるでしょう。それらにどのように対処するかについては、Address already in useを見てください。
If another program is already using port 5000, you'll see ``OSError: [Errno 98]`` or ``OSError: [WinError 10013]`` when the server tries to start. See :ref:`address-already-in-use` for how to handle that.
デバッグモード Debug Mode
デバッグモードでは、flask runコマンドはインタラクティブなデバッガと再読み込み機能(reloader)を標準で有効にし、エラーを見てデバッグすることを容易にします。デバッグモードを有効にするには、--debugオプションを使います。
In debug mode, the ``flask run`` command will enable the interactive debugger and the reloader by default, and make errors easier to see and debug. To enable debug mode, use the ``--debug`` option.
$ flask --app hello --debug run
 * Serving Flask app "hello"
 * Debug mode: on
 * Running on http://127.0.0.1:5000/ (Press CTRL+C to quit)
 * Restarting with inotify reloader
 * Debugger is active!
 * Debugger PIN: 223-456-919
再読み込み機能(Reloader)によるファイルの監視および無視 Watch and Ignore Files with the Reloader
デバッグモードを使用しているとき、あなたのPythonコードまたはimportされているモジュールを変更するたびにreloaderが始動します。reloaderは、--extra-filesオプションまたはFLASK_RUN_EXTRA_FILES環境変数を使用して、追加ファイルを監視できます。複数のパスは:、もしくはWindowsでは;を使用して分けられます。
When using debug mode, the reloader will trigger whenever your Python code or imported modules change. The reloader can watch additional files with the ``--extra-files`` option. Multiple paths are separated with ``:``, or ``;`` on Windows.
$ flask run --extra-files file1:dirA/file2:dirB/
 * Running on http://127.0.0.1:8000/
 * Detected change in '/path/to/file1', reloading
reloaderはfnmatchのパターンを--exclude-patternsオプションと一緒に使ってファイルを無視することもできます。複数のパターンは:、またはWindowsでは;を使って分けられます。
The reloader can also ignore files using :mod:`fnmatch` patterns with the ``--exclude-patterns`` option. Multiple patterns are separated with ``:``, or ``;`` on Windows.
シェルの開始(Open a Shell) Open a Shell
自分のアプリケーションの中でデータを調べるために、shellコマンドを使ってインタラクティブなPythonのシェルを開始できます。application contextは有効(active)になり、アプリのインスタンスがimportされます。:
To explore the data in your application, you can start an interactive Python shell with the :func:`shell <cli.shell_command>` command. An application context will be active, and the app instance will be imported. ::
$ flask shell
Python 3.10.0 (default, Oct 27 2021, 06:59:51) [GCC 11.1.0] on linux
App: example [production]
Instance: /home/david/Projects/pallets/flask/instance
>>>
その他に自動的にimportされるものを追加するには、shell_context_processor()を使用します。
Use :meth:`~Flask.shell_context_processor` to add other automatic imports.
dotenvからの環境変数読み込み Environment Variables From dotenv
flaskコマンドはどのコマンドのどのオプションでも環境変数を使った設定をサポートします。変数は、例えばFLASK_APPやFLASK_RUN_PORTのように、FLASK_OPTIONまたはFLASK_COMMAND_OPTIONのような名前になります。
The ``flask`` command supports setting any option for any command with environment variables. The variables are named like ``FLASK_OPTION`` or ``FLASK_COMMAND_OPTION``, for example ``FLASK_APP`` or ``FLASK_RUN_PORT``.
新しい端末を開くたびに毎回コマンドを走らせたり環境変数を設定したりする代わりに、自動的に環境変数を設定するために、Flaskのdotenvサポートを使用できます。 Rather than passing options every time you run a command, or environment variables every time you open a new terminal, you can use Flask's dotenv support to set environment variables automatically.
もしpython-dotenvがインストールされている場合、flaskコマンドを実行すると.envと.flaskenvの中で定義されている環境変数が設定されます。--env-fileオプションを使って読み組む追加ファイルも指定できます。dotenvファイルは、新しい端末を開くたびに毎回手作業で--appまたはFLASK_APP環境変数を設定をする必要をなくし、いくつかの展開するサービス(deployment service)を機能させるやり方と同じような、環境変数を使って設定をするために使用できます。
If `python-dotenv`_ is installed, running the ``flask`` command will set environment variables defined in the files ``.env`` and ``.flaskenv``. You can also specify an extra file to load with the ``--env-file`` option. Dotenv files can be used to avoid having to set ``--app`` or ``FLASK_APP`` manually, and to set configuration using environment variables similar to how some deployment services work.
.flaskenvで設定された変数は.envで設定されたもので上書きされ、それらは、コマンドラインで設定された変数で上書きされます。.flaskenvは、例えばFLASK_APPのような、公開される変数のために使用されるべきであり、一方.envはプライベートな変数を設定できるようにするために(ソースコード管理の)リポジトリにはコミットするべきではありません。
Variables set on the command line are used over those set in :file:`.env`, which are used over those set in :file:`.flaskenv`. :file:`.flaskenv` should be used for public variables, such as ``FLASK_APP``, while :file:`.env` should not be committed to your repository so that it can set private variables.
flaskを呼び出したディレクトリから親へと上りながら、それらのファイル(.envおよび.flaskenv)の場所を見つけるためにディレクトリが調べられます。
Directories are scanned upwards from the directory you call ``flask`` from to locate the files.
それらのファイルはflaskコマンドもしくは呼び出されているrun()によってのみ読み込まれます。もしそれらのファイルを本番環境の中で走らせるときに読み込みたい場合、手動でload_dotenv()を呼び出す必要があります。
The files are only loaded by the ``flask`` command or calling :meth:`~Flask.run`. If you would like to load these files when running in production, you should call :func:`~cli.load_dotenv` manually.
コマンドオプションの設定 Setting Command Options
Clickはコマンドオプションの標準の値を環境変数から読み込むよう設定されています。それらの変数にはFLASK_COMMAND_OPTIONのパターンが使用されています。例えば、runコマンド用のポートを設定するために、flask run --port 8000の代わりに以下を使用できます:
Click is configured to load default values for command options from environment variables. The variables use the pattern ``FLASK_COMMAND_OPTION``. For example, to set the port for the run command, instead of ``flask run --port 8000``:
$ export FLASK_RUN_PORT=8000
$ flask run
 * Running on http://127.0.0.1:8000/
$ set -x FLASK_RUN_PORT 8000
$ flask run
 * Running on http://127.0.0.1:8000/
> set FLASK_RUN_PORT=8000
> flask run
 * Running on http://127.0.0.1:8000/
> $env:FLASK_RUN_PORT = 8000
> flask run
 * Running on http://127.0.0.1:8000/
標準設定のコマンドオプションを制御するために、これらの値を.flaskenvファイルにFLASK_APPと同じように追加できます。
These can be added to the ``.flaskenv`` file just like ``FLASK_APP`` to control default command options.
dotenvの無効化 Disable dotenv
もしdotenvファイルを見つけたにもかかわらずpython-dotenvがインストールされていない場合、flaskコマンドはメッセージを表示します。
The ``flask`` command will show a message if it detects dotenv files but python-dotenv is not installed.
$ flask run
 * Tip: There are .env files present. Do "pip install python-dotenv" to use them.
FLASK_SKIP_DOTENV環境変数を設定することで、python-dotenvがインストールされていたときでさえもdotenvファイルを読み込まないようFlaskへ伝えることができます。これは、それらを手作業で読み込みたいときや、それらを既に読み込んでいるproject runner(訳注: コンパイル・テスト・パッケージ作成など、よく実施される一纒まり処理を、簡単な操作でまとめて実施できるようにする、makeコマンドのようなツールを指していると思います)を使用している場合には役立つでしょう。環境変数はアプリのロードより前に設定されている必要があり、そうでなければ期待したようには(アプリが)設定されないであろうことを忘れないでください。
You can tell Flask not to load dotenv files even when python-dotenv is installed by setting the ``FLASK_SKIP_DOTENV`` environment variable. This can be useful if you want to load them manually, or if you're using a project runner that loads them already. Keep in mind that the environment variables must be set before the app loads or it won't configure as expected.
$ export FLASK_SKIP_DOTENV=1
$ flask run
$ set -x FLASK_SKIP_DOTENV 1
$ flask run
> set FLASK_SKIP_DOTENV=1
> flask run
> $env:FLASK_SKIP_DOTENV = 1
> flask run
virtualenvからの環境変数読み込み Environment Variables From virtualenv
もしdotenvのサポートをインストールしたくない場合でも、virtualenvのactivateスクリプトの最後へ追加することで環境変数を設定することができます。virtualenvをactivateすると、変数が設定されます。
If you do not want to install dotenv support, you can still set environment variables by adding them to the end of the virtualenv's :file:`activate` script. Activating the virtualenv will set the variables.
UnixのBashでは、venv/bin/activateに追加します:
Unix Bash, :file:`venv/bin/activate`::
$ export FLASK_APP=hello
Fishでは、venv/bin/activate.fishに追加します:
Fish, :file:`venv/bin/activate.fish`::
$ set -x FLASK_APP hello
WindowsのCMDでは、venv\Scripts\activate.batに追加します:
Windows CMD, :file:`venv\\Scripts\\activate.bat`::
> set FLASK_APP=hello
WindowsのPowershellでは、venv\Scripts\activate.ps1に追加します:
Windows Powershell, :file:`venv\\Scripts\\activate.ps1`::
> $env:FLASK_APP = "hello"
.flaskenvは(ソースコード管理の)リポジトリへコミットして、リポジトリをチェックアウトしたプロジェクトではどこでも自動的に機能するようにできるため、このやり方よりは、dotenvのサポートを使用する方が好ましいです。
It is preferred to use dotenv support over this, since :file:`.flaskenv` can be committed to the repository so that it works automatically wherever the project is checked out.
独自のコマンド(Custom Commands) Custom Commands
flaskコマンドはClickを使用して実装されています。コマンド作成に関する全体を網羅した情報についてはClickプロジェクトのドキュメントを確認してください。
The ``flask`` command is implemented using `Click`_. See that project's documentation for full information about writing commands.
以下の例は、name引数を受け取るcreate-userコマンドを追加します。:
This example adds the command ``create-user`` that takes the argument ``name``. ::
import click
from flask import Flask

app = Flask(__name__)

@app.cli.command("create-user")
@click.argument("name")
def create_user(name):
    ...
$ flask create-user admin
以下の例は同じコマンドを追加しますが、グループの中のコマンドのひとつであるuser createとして追加します。これは関連する複数のコマンドを編成したいときに便利です。
This example adds the same command, but as ``user create``, a command in a group. This is useful if you want to organize multiple related commands. ::
import click
from flask import Flask
from flask.cli import AppGroup

app = Flask(__name__)
user_cli = AppGroup('user')

@user_cli.command('create')
@click.argument('name')
def create_user(name):
    ...

app.cli.add_command(user_cli)
$ flask user create demo
自分の独自コマンドをどのようにテストするかの概要についてはCLI実行プログラムを使ったコマンドの実行を確認してください。 See :ref:`testing-cli` for an overview of how to test your custom commands.
Blueprintsを使ったコマンドの登録 Registering Commands with Blueprints
もし自分のアプリケーションがblueprintを使っている場合、CLIコマンドを直接それらのblueprintに適宜登録できます。blueprintが自分のアプリケーションに登録されたとき、関連付けられているコマンドはflaskコマンドから利用可能になります。標準設定では、それらのコマンドはblueprintの名前に合致(match)するグループへと入れ子(nest)にされます。
If your application uses blueprints, you can optionally register CLI commands directly onto them. When your blueprint is registered onto your application, the associated commands will be available to the ``flask`` command. By default, those commands will be nested in a group matching the name of the blueprint.
from flask import Blueprint

bp = Blueprint('students', __name__)

@bp.cli.command('create')
@click.argument('name')
def create(name):
    ...

app.register_blueprint(bp)
$ flask students create alice
Blueprintオブジェクトを作成するときcli_groupパラメータを指定することによって、もしくは後からapp.register_blueprint(bp, cli_group='...')を使って、コマンドのグループ名を変更できます。以下は同じ処理になります:
You can alter the group name by specifying the ``cli_group`` parameter when creating the :class:`Blueprint` object, or later with :meth:`app.register_blueprint(bp, cli_group='...') <Flask.register_blueprint>`. The following are equivalent:
bp = Blueprint('students', __name__, cli_group='other')
# or
app.register_blueprint(bp, cli_group='other')
$ flask other create alice
cli_group=Noneを指定すると入れ子を削除して、コマンドを直接アプリケーションのレベルへまとめます。
Specifying ``cli_group=None`` will remove the nesting and merge the commands directly to the application's level:
bp = Blueprint('students', __name__, cli_group=None)
# or
app.register_blueprint(bp, cli_group=None)
$ flask create alice
アプリケーションのコンテキスト(Application Context) Application Context
FlaskアプリのcliまたはFlaskGroupのcommand()デコレータ(decorator)を使って追加されたコマンドは、(訳注: Flask内で各リクエストのapplication contextをstack構造で格納・管理している領域に)pushされたapplication contextと一緒に実行されるため、あなたのコマンドおよびパラメータはapp(のインスタンス)およびその設定情報にアクセスが可能です。with_appcontext()を使用して同じ振る舞いを得ることはできますが、殆どの場合は不要です。
Commands added using the Flask app's :attr:`~Flask.cli` or :class:`~flask.cli.FlaskGroup` :meth:`~cli.AppGroup.command` decorator will be executed with an application context pushed, so your custom commands and parameters have access to the app and its configuration. The :func:`~cli.with_appcontext` decorator can be used to get the same behavior, but is not needed in most cases.
import click
from flask.cli import with_appcontext

@click.command()
@with_appcontext
def do_work():
    ...

app.cli.add_command(do_work)
プラグイン Plugins
Flaskはflask.commandsのentry pointで指定されたコマンドを自動的に読み込みます。これは、インストールされたときにはコマンドを追加したいFlask拡張にとっては便利です。entry pointはsetup.pyの中で指定されます:
Flask will automatically load commands specified in the ``flask.commands`` `entry point`_. This is useful for extensions that want to add commands when they are installed. Entry points are specified in :file:`setup.py` ::
from setuptools import setup

setup(
    name='flask-my-extension',
    ...,
    entry_points={
        'flask.commands': [
            'my-command=flask_my_extension.commands:cli'
        ],
    },
)
(この例では)flask_my_extension/commands.pyの内側で、Clickオブジェクトをexportできます(訳注: entry pointとしてexportできるということだと思います。「@click.command()」デコレータはClickのCommandオブジェクトを作ります。この例ではsetup.pyの中で「my-command=flask_my_extension.commands:cli」を指定しているため、「flask_my_extension/commands.py」ファイルの中で、clickのCommandオブジェクトである「cli」を用意すれば、Flaskが自動的に読み込む、という意味合いだと思います):
Inside :file:`flask_my_extension/commands.py` you can then export a Click object::
import click

@click.command()
def cli():
    ...
一度あなたのFlaskプロジェクトと同じvirtualenvに(上記の例の)パッケージがインストールされると、flask my-commandを実行してコマンドを呼び出せるようになります。
Once that package is installed in the same virtualenv as your Flask project, you can run ``flask my-command`` to invoke the command.
独自のスクリプト Custom Scripts
app factoryパターンを使用しているとき、自分のClickスクリプトを定義できるとさらに便利かもしれません。--appを使用してFlaskが自分のアプリケーションを読み込めるようにする代わりに、自分独自のClickオブジェクトを作成し(訳注: Clickライブラリでは、Clickオブジェクトを作成するとコマンドラインで実行するプログラムになります)、console scriptのentry pointとしてexportできます。
When you are using the app factory pattern, it may be more convenient to define your own Click script. Instead of using ``--app`` and letting Flask load your application, you can create your own Click object and export it as a `console script`_ entry point.
FlaskGroupのインスタンスを作成して、それにfactoryを渡します:
Create an instance of :class:`~cli.FlaskGroup` and pass it the factory::
import click
from flask import Flask
from flask.cli import FlaskGroup

def create_app():
    app = Flask('wiki')
    # other setup
    return app

@click.group(cls=FlaskGroup, create_app=create_app)
def cli():
    """Management script for the Wiki application."""
setup.pyの中でentry pointを定義します:
Define the entry point in :file:`setup.py`::
from setuptools import setup

setup(
    name='flask-my-extension',
    ...,
    entry_points={
        'console_scripts': [
            'wiki=wiki:cli'
        ],
    },
)
virtualenvの中でアプリケーションを編集可能モード(editable mode)でインストールすると独自スクリプトが利用可能になります。--appを設定する必要はないことに注意してください。:
Install the application in the virtualenv in editable mode and the custom script is available. Note that you don't need to set ``--app``. ::
$ pip install -e .
$ wiki run
独自スクリプトの中のエラー Errors in Custom Scripts
独自スクリプトを使用するとき、もしmoduleレベルのコードでエラーを導入してしまった場合(訳注: 「import ...」しただけでエラーが発生するような状態にしてしまった場合)、entry pointがもはや読み込めなくなるため、再読み込み機能(reloader)に障害が起きます(fail)。 When using a custom script, if you introduce an error in your module-level code, the reloader will fail because it can no longer load the entry point.
flaskコマンドは、あなたのコードとは分かれているため、このような問題は持たず(訳注: flaskコマンドのあるモジュールをimportするだけでエラーが発生するようなことはない、という意味合いだと思います)、そのため殆どのケースでは推奨されます。
The ``flask`` command, being separate from your code, does not have this issue and is recommended in most cases.
PyCharmとの統合 PyCharm Integration
PyCharm Professional は、開発サーバーを走らせる特殊なFlask実行設定を提供します。Community Editionと、run以外のコマンドでは、独自の実行用の設定を作成する必要があります。これらの指定内容は、あなたが使いたい他のどんなIDEでも似たようなものでしょう。
PyCharm Professional provides a special Flask run configuration to run the development server. For the Community Edition, and for other commands besides ``run``, you need to create a custom run configuration. These instructions should be similar for any other IDE you use.
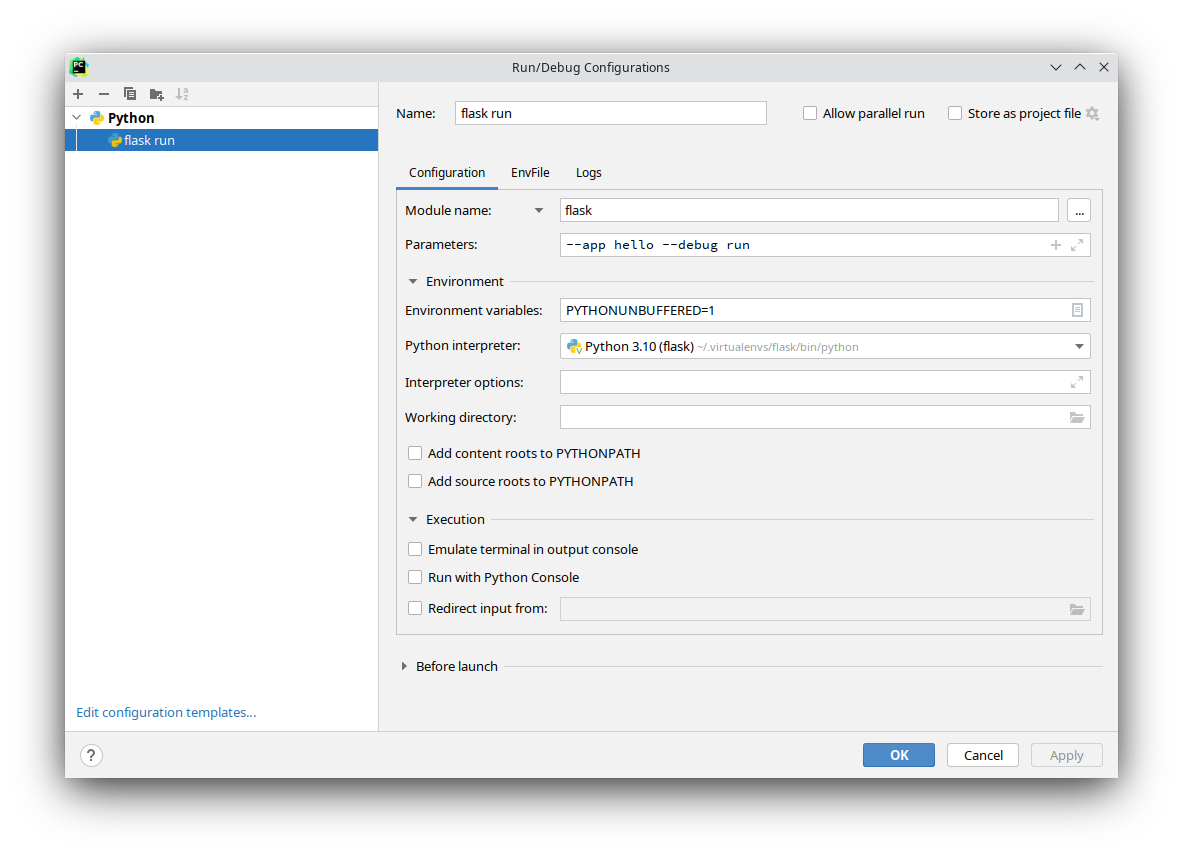
PyCharmで、プロジェクトを開いて、メニューバーからRunをクリックしてEdit Configurationsへ移動します。以下のような画面を見られるでしょう: In PyCharm, with your project open, click on *Run* from the menu bar and go to *Edit Configurations*. You'll see a screen similar to this:
一度flask run用の設定を作成すれば、他のどのコマンドを呼び出すために設定をコピーして変更ができます。
Once you create a configuration for the ``flask run``, you can copy and change it to call any other command.
「+ (Add New Configuration)」ボタンをクリックし、Pythonを選択します。「flask run」のような名前を設定に与えます。 Click the *+ (Add New Configuration)* button and select *Python*. Give the configuration a name such as "flask run".
Script pathドロップダウンをクリックし、それをModule nameへ変更し、それからflaskを入力します
Click the *Script path* dropdown and change it to *Module name*, then input ``flask``.
Parameter欄は、実行するCLIコマンドを全ての引数と一緒に指定します。この例では、開発サーバをデバッグモードで走らせる--app hello --debug runを使用します。--app helloは自分のFlaskアプリに使うimportまたはファイルにする必要があります。
The *Parameters* field is set to the CLI command to execute along with any arguments. This example uses ``--app hello --debug run``, which will run the development server in debug mode. ``--app hello`` should be the import or file with your Flask app.
もし自分のプロジェクトをパッケージとしてvirtualenvの中にインストールしていた場合、PYTHONPATHオプションのチェックを外しても良いでしょう。後でアプリをデプロイするやり方に、これはより正確に合います。 If you installed your project as a package in your virtualenv, you may uncheck the *PYTHONPATH* options. This will more accurately match how you deploy later.
設定を保存してからウインドウを閉じるためにOKをクリックします。メインのPyCharmウインドウで設定を選択してから、隣のplayボタンをクリックしてサーバーを実行します。 Click *OK* to save and close the configuration. Select the configuration in the main PyCharm window and click the play button next to it to run the server.
この時点でPyCharmの中からflask runを実行する設定を持っており、その設定をコピーしてから、異なるCLIコマンドを実行するためにParameters引数を変更できます。
Now that you have a configuration for ``flask run``, you can copy that configuration and change the *Parameters* argument to run a different CLI command.