クイックスタート Quickstart
すぐ始めたいですか?このページはFlaskのイントロダクションに良いでしょう。最初にプロジェクトを準備しFlaskをインストールするために、インストールに従ってください。 Eager to get started? This page gives a good introduction to Flask. Follow :doc:`installation` to set up a project and install Flask first.
最少のアプリケーション A Minimal Application
最少のFlaskアプリケーションは以下のようなものになります: A minimal Flask application looks something like this:
from flask import Flask

app = Flask(__name__)

@app.route("/")
def hello_world():
    return "<p>Hello, World!</p>"
では、そのコードは何をしているのでしょうか? So what did that code do?
最初に、
Flaskクラスをimportしています。このクラスのインスタンスはWSGI(訳注: Pythonで標準化されている、WebアプリとWebサーバ間のインタフェース)アプリケーションになります。 First we imported the :class:`~flask.Flask` class. An instance of this class will be our WSGI application.次に、Flaskクラスのインスタンスを作成します。最初の引数はアプリケーションのモジュール(訳注: 簡単に言うと拡張子pyのPythonファイル)またはパッケージ(訳注: 簡単に言うとモジュールをまとめて格納したディレクトリ)の名前です。
__name__はモジュールまたはパッケージの名前用に殆どの場合で適切な便利なショートカットです。これはテンプレート、静的ファイルなどのリソースを探す場所をFlaskが知るために必要になります。 Next we create an instance of this class. The first argument is the name of the application's module or package. ``__name__`` is a convenient shortcut for this that is appropriate for most cases. This is needed so that Flask knows where to look for resources such as templates and static files.それから
route()デコレータを使って、どのURLが関数の引き金になるべきかをFlaskに伝えます。 We then use the :meth:`~flask.Flask.route` decorator to tell Flask what URL should trigger our function.その関数はユーザのブラウザで表示したいメッセージを返します。標準のコンテント・タイプはHTMLなので、HTML文字列はブラウザによって変換表示されます。 The function returns the message we want to display in the user's browser. The default content type is HTML, so HTML in the string will be rendered by the browser.
これをhello.pyもしくは似たようなものに保存します。Flask自身と衝突するため、自分のアプリケーションはflask.pyとは名付けないように必ずしてください。
Save it as :file:`hello.py` or something similar. Make sure to not call your application :file:`flask.py` because this would conflict with Flask itself.
アプリケーションを実行するには、flaskコマンドまたはpython -m flaskを使用します。--app(訳注: 原文では「-app」ですが、多分誤記)を使用して、自分のアプリケーションがどこにあるかをFlaskへ伝える必要があります。
To run the application, use the ``flask`` command or ``python -m flask``. You need to tell the Flask where your application is with the ``-app`` option.
$ flask --app hello run
 * Serving Flask app 'hello'
 * Running on http://127.0.0.1:5000 (Press CTRL+C to quit)
アプリケーションを見つけるときの振る舞い(Application Discovery Behavior) Application Discovery Behavior
手短にいうと、もしapp.pyまたはwsgi.pyという名前のファイルであれば、--appを使用する必要はありません。さらなる詳細はコマンドライン・インタフェースを見てください。
As a shortcut, if the file is named ``app.py`` or ``wsgi.py``, you don't have to use ``--app``. See :doc:`/cli` for more details.
これはとてもシンプルな内蔵サーバを起動し、それはテスト用には十分ですが、おそらく本番環境で使用したいものではないでしょう。デプロイ(訳注: 実行環境への移行のような意味合い)のオプションについては、Deploying to Productionを調べてください。 This launches a very simple builtin server, which is good enough for testing but probably not what you want to use in production. For deployment options see :doc:`deploying/index`.
それではhttp://127.0.0.1:5000/を見てください、あなたのhello worldのお出迎えを確認できるはずです。 Now head over to http://127.0.0.1:5000/, and you should see your hello world greeting.
もし他のプログラムが既に5000番ポートを使用中であるときは、サーバを開始しようと試みたときにOSError: [Errno 98]またはOSError: [WinError 10013]を見ることになるでしょう。それらにどのように対処するかについては、Address already in useを見てください。
If another program is already using port 5000, you'll see ``OSError: [Errno 98]`` or ``OSError: [WinError 10013]`` when the server tries to start. See :ref:`address-already-in-use` for how to handle that.
外部から見えるサーバ Externally Visible Server
もしサーバを実行した場合、サーバは自分のコンピュータからだけアクセス可能で、他にはネットワークのどこからもアクセスできないことに気付くでしょう。デバッギングモードでは、アプリケーションのユーザがコンピュータ上で任意のPythonコードを実行可能になるために、これが標準設定になっています。 If you run the server you will notice that the server is only accessible from your own computer, not from any other in the network. This is the default because in debugging mode a user of the application can execute arbitrary Python code on your computer.
デバッガを無効にしているか、ネットワーク上のユーザを信頼する場合、単純にコマンドラインへ--host=0.0.0.0を追加すれば、サーバへのアクセスを公開できます:
If you have the debugger disabled or trust the users on your network, you can make the server publicly available simply by adding ``--host=0.0.0.0`` to the command line::
$ flask run --host=0.0.0.0
こうすると、全ての公開されているIP上でアクセスを受け付けるよう、OSへ伝えます。 This tells your operating system to listen on all public IPs.
デバッグモード Debug Mode
flask runコマンドはただ開発用サーバを開始する以上のことができます。デバッグモードを有効にすると、コードが変更されたらサーバが自動的に再読み込みし、リクエスト処理中にエラーが起きたらブラウザの中にインタラクティブなデバッガを表示するようになります。
The ``flask run`` command can do more than just start the development server. By enabling debug mode, the server will automatically reload if code changes, and will show an interactive debugger in the browser if an error occurs during a request.
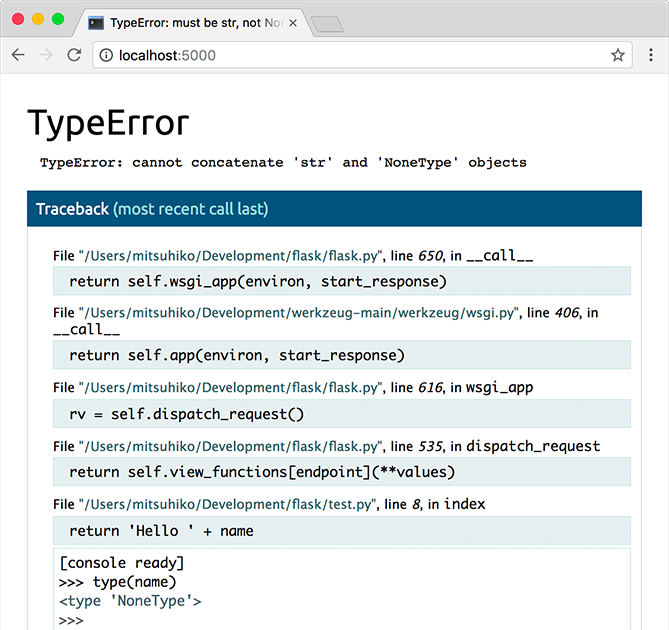
警告
デバッガはブラウザから任意のPythonコードを実行できるようにします。それはpinによって保護されていますが、それでも重要なセキュリティリスクを意味します。本番環境では開発サーバやデバッガを走らせないようにしてください。 The debugger allows executing arbitrary Python code from the browser. It is protected by a pin, but still represents a major security risk. Do not run the development server or debugger in a production environment.
デバッグモードを有効にするには、--debugオプションを使います。
To enable debug mode, use the ``--debug`` option.
$ flask --app hello --debug run
 * Serving Flask app 'hello'
 * Debug mode: on
 * Running on http://127.0.0.1:5000 (Press CTRL+C to quit)
 * Restarting with stat
 * Debugger is active!
 * Debugger PIN: nnn-nnn-nnn
以下も参照してください: See also:
デバッグモードで走らせることに関する情報について、開発サーバとコマンドライン・インタフェース。 :doc:`/server` and :doc:`/cli` for information about running in debug mode.
組み込みのデバッガおよびその他のデバッガを使うことに関する情報について、アプリケーション・エラーのデバッグ。 :doc:`/debugging` for information about using the built-in debugger and other debuggers.
エラーのログおよび良いエラーページの表示について、ログ処理(Logging)とアプリケーションのエラーの処理。 :doc:`/logging` and :doc:`/errorhandling` to log errors and display nice error pages.
HTMLのエスケープ処理 HTML Escaping
HTML(Flaskでの標準のレスポンスのタイプ)を返すとき、変換表示される出力の中にある、ユーザが提供するあらゆる値はインジェクション攻撃から保護するためにエスケープされる必要があります。後で紹介されるJinjaを使って変換表示されるHTMLテンプレートでは、これを自動的に行います。 When returning HTML (the default response type in Flask), any user-provided values rendered in the output must be escaped to protect from injection attacks. HTML templates rendered with Jinja, introduced later, will do this automatically.
以下のコード例にあるescape()は手動で使うことができます。それは殆どの例の中では簡潔さのために省略されますが、信用できないデータをどのように使うかは常に把握しておくべきです。
:func:`~markupsafe.escape`, shown here, can be used manually. It is omitted in most examples for brevity, but you should always be aware of how you're using untrusted data.
from markupsafe import escape

@app.route("/<name>")
def hello(name):
    return f"Hello, {escape(name)}!"
(この例で)もしもあるユーザがnameとして<script>alert("bad")</script>を提出できた場合、エスケープ処理によってそれは、ユーザのブラウザの中でスクリプトとして走るのではなく、テキストとして変換表示されます。
If a user managed to submit the name ``<script>alert("bad")</script>``, escaping causes it to be rendered as text, rather than running the script in the user's browser.
routeの(引数の)中にある<name>はURLから値を捉えてview関数へその値を渡します。それらの変数ルールは以下で説明されます。
``<name>`` in the route captures a value from the URL and passes it to the view function. These variable rules are explained below.
経路設定(Routing) Routing
最近のwebアプリケーションは、ユーザに役立つような意味のあるURLを使用します。もし、記憶できてページへ直接訪れるために直接指定できる、意味のあるURLを使用していれば、ユーザはそのページをより好きになり、再訪問するようになるでしょう。 Modern web applications use meaningful URLs to help users. Users are more likely to like a page and come back if the page uses a meaningful URL they can remember and use to directly visit a page.
関数とURLを結び付け(bind)したいときは、route()デコレータを使用します。:
Use the :meth:`~flask.Flask.route` decorator to bind a function to a URL. ::
@app.route('/')
def index():
    return 'Index Page'

@app.route('/hello')
def hello():
    return 'Hello, World'
もっとできることがあります!URLの一部を動的に変化させたり、複数のルールを関数に付与することも可能です。 You can do more! You can make parts of the URL dynamic and attach multiple rules to a function.
変数のルール Variable Rules
変数のセクションへ<variable_name>と目印をつけることで、URLに変数のセクションを追加することができます。こうすると、関数は<variable_name>をキーワード引数として受け取るようになります。必須ではないですが、<converter:variable_name>のように引数のタイプを指定できる、コンバータを使用できます。
You can add variable sections to a URL by marking sections with ``<variable_name>``. Your function then receives the ``<variable_name>`` as a keyword argument. Optionally, you can use a converter to specify the type of the argument like ``<converter:variable_name>``. ::
from markupsafe import escape

@app.route('/user/<username>')
def show_user_profile(username):
    # show the user profile for that user
    return f'User {escape(username)}'

@app.route('/post/<int:post_id>')
def show_post(post_id):
    # show the post with the given id, the id is an integer
    return f'Post {post_id}'

@app.route('/path/<path:subpath>')
def show_subpath(subpath):
    # show the subpath after /path/
    return f'Subpath {escape(subpath)}'
コンバータの種類: Converter types:
|
(標準設定)スラッシュ(/)以外の全てのテキストを受け付けます (default) accepts any text without a slash |
|
正の整数を受け付けます accepts positive integers |
|
正の浮動小数点の値を受け付けます accepts positive floating point values |
|
|
|
UUID文字列を受け付けます accepts UUID strings |
ユニークなURLと転送(Redirection)の振舞 Unique URLs / Redirection Behavior
最後のスラッシュ(/)の使い方が、以下の2つのルール(訳注: 普通はrouteデコレータを使って指定する、URLと関数との対応付けのこと。routeデコレータは内部的にWerkzeugのRuleクラスのインスタンスを作成しています)では異なっています。: The following two rules differ in their use of a trailing slash. ::
@app.route('/projects/')
def projects():
    return 'The project page'

@app.route('/about')
def about():
    return 'The about page'
projectsエンドポイントの正規化(訳注: 記法の揺らぎを統一するような意味合い)されたURLでは、最後にスラッシュがあります。これはファイルシステムでのフォルダに似ています。もし最後のスラッシュなし(/projects)でURLへアクセスした場合、Flaskは最後にスラッシュのある正規化されたURL(/projects/)へ転送(redirect)します。(訳注: エンドポイントはview用の関数などを特定するもので、Flask実装上はdictionaryであるview_functions属性のキーになります。Flask実装では、アプリが使用するview用の関数などは全てFlaskインスタンスのview_functions属性に、エンドポイントをキーに関数本体を値にして登録されます。たいていは関数名とエンドポイントは同じですが異なる値がエンドポイントになる場合もあります。Flaskではroute()デコレータ使うと内部的にWerkzeugのRuleインスタンスを作成してURLのパターンとエンドポイントを対応付けます)
The canonical URL for the ``projects`` endpoint has a trailing slash. It's similar to a folder in a file system. If you access the URL without a trailing slash (``/projects``), Flask redirects you to the canonical URL with the trailing slash (``/projects/``).
aboutエンドポイントの正規化されたURLでは、最後にスラッシュがありません。これはファイルシステムでのファイルのパス名に似ています。もし最後にスラッシュを付けたURL(/about/)へアクセスしたときは404の「Not Found」エラーが発生します。こうすると、これらのリソースに対するURLを唯ひとつに(ユニークに)保てるため、検索エンジンが同じページを重ねて登録することを防ぐ手助けになります。
The canonical URL for the ``about`` endpoint does not have a trailing slash. It's similar to the pathname of a file. Accessing the URL with a trailing slash (``/about/``) produces a 404 "Not Found" error. This helps keep URLs unique for these resources, which helps search engines avoid indexing the same page twice.
URLの構築 URL Building
ある特定の関数に対応するURLを構築するには、url_for()関数を使用します。それは関数名(訳注: 厳密にはエンドポイント)を最初の引数に受け付けて、さらに、URLルールの変数部分に対応する、好きな数だけのキーワード引数を受け付けます。不明な変数パートはqueryパラメータとしてURLの後ろ(訳注: ?key=valueの部分)に付けられます。
To build a URL to a specific function, use the :func:`~flask.url_for` function. It accepts the name of the function as its first argument and any number of keyword arguments, each corresponding to a variable part of the URL rule. Unknown variable parts are appended to the URL as query parameters.
URLをテンプレートへハードコーディングする代わりに、(関数名から)URLへと逆変換するurl_for()関数を使ってURLを構築する方が、なぜ好ましいのでしょうか?(訳注: テンプレートの中でリンクなどがあったとき、そこへURLを直接記述するのではなく、リンク先で使いたい関数名からURLへ変換する処理を記述した方がなぜ好ましいか、という意味合い)
Why would you want to build URLs using the URL reversing function :func:`~flask.url_for` instead of hard-coding them into your templates?
URLをハードコーディングするよりもURLへ逆変換する方が、分かり易い(descriptive)ことが多いためです。 Reversing is often more descriptive than hard-coding the URLs.
(URLを変更するとき)ハードコーディングされた(複数の場所に埋め込まれているかもしれない)URLを忘れずに手作業で変更する必要がある代わりに、(関数とURLを対応付けている箇所で)一気に変更することができます。(訳注: 普通は
route()デコレータで指定しているURLルールを変更すれば、テンプレートでそのview関数を参照している箇所は変更せずにURLを変更できることを指していると思います) You can change your URLs in one go instead of needing to remember to manually change hard-coded URLs.URLを構築する処理では、特殊文字のエスケープ処理を透過的に扱います。 URL building handles escaping of special characters transparently.
生成されたパスは常に絶対パスであり、相対パスによるブラウザ上での予想外の振舞を回避します。 The generated paths are always absolute, avoiding unexpected behavior of relative paths in browsers.
もしアプリケーションがURLのroot以外のパス、例えば、
/の代わりに/myapplicationへ置かれたときでも、url_for()は適切に処理します。 If your application is placed outside the URL root, for example, in ``/myapplication`` instead of ``/``, :func:`~flask.url_for` properly handles that for you.
以下の例では、url_for()を試すためにtest_request_context()メソッドを使っています。test_request_context()はFlaskに、Pythonシェルを使っている場合であってもリクエスト(訳注: HTTPなどの通信リクエスト)を処理しているかのように振る舞うよう伝えます。コンテキストの局所的オブジェクト(Context Locals)を参照ください。
For example, here we use the :meth:`~flask.Flask.test_request_context` method to try out :func:`~flask.url_for`. :meth:`~flask.Flask.test_request_context` tells Flask to behave as though it's handling a request even while we use a Python shell. See :ref:`context-locals`.
from flask import url_for

@app.route('/')
def index():
    return 'index'

@app.route('/login')
def login():
    return 'login'

@app.route('/user/<username>')
def profile(username):
    return f'{username}\'s profile'

with app.test_request_context():
    print(url_for('index'))
    print(url_for('login'))
    print(url_for('login', next='/'))
    print(url_for('profile', username='John Doe'))
/
/login
/login?next=/
/user/John%20Doe
HTTPメソッド HTTP Methods
webアプリはURLへアクセスするときに異なるHTTPメソッドを使用します。Flaskで作業するときは、HTTPメソッドに親しんでおいた方が良いでしょう。標準設定では、経路(route)はGETメソッドにだけ応答します。異なるHTTPメソッドを処理するために、route()デコレータのmethod引数を使用できます。:
Web applications use different HTTP methods when accessing URLs. You should familiarize yourself with the HTTP methods as you work with Flask. By default, a route only answers to ``GET`` requests. You can use the ``methods`` argument of the :meth:`~flask.Flask.route` decorator to handle different HTTP methods. ::
from flask import request

@app.route('/login', methods=['GET', 'POST'])
def login():
    if request.method == 'POST':
        return do_the_login()
    else:
        return show_the_login_form()
上記の例は経路(route)用の全てのメソッド(の実装)を1つの関数内に保持しており、それはそれぞれの部分(訳注:各メソッドに対応する実装部分)がいくらかの共通データを使うときは便利な場合があります。 The example above keeps all methods for the route within one function, which can be useful if each part uses some common data.
違うメソッド用のviewを違う関数に分けることもできます。Flaskはそのような経路(訳注: メソッドごとにview関数が分かれているroute)を修飾する(訳注: 「@app.get()」のように、「@~」と関数の直前に付けること)ショートカットに、get()、post()、などをありがちなHTTPメソッドごとに提供しています。
You can also separate views for different methods into different functions. Flask provides a shortcut for decorating such routes with :meth:`~flask.Flask.get`, :meth:`~flask.Flask.post`, etc. for each common HTTP method.
@app.get('/login')
def login_get():
    return show_the_login_form()

@app.post('/login')
def login_post():
    return do_the_login()
もしGETが(method引数の中に)存在する場合、Flaskは自動的にHEADメソッドのサポートを追加して、HTTP RFCに従ってHEADリクエストを処理します。同様に、あなたにとって良いように、OPTIONSも自動的に実装されます。
If ``GET`` is present, Flask automatically adds support for the ``HEAD`` method and handles ``HEAD`` requests according to the `HTTP RFC`_. Likewise, ``OPTIONS`` is automatically implemented for you.
静的ファイル Static Files
動的なwebアプリケーションでも静的ファイルを必要とします。普通は、静的ファイルはCSSとJavaScriptがもたらされるところです。webサーバがそれらを扱うように構成されていると理想的ですが、開発中はFlaskで同様な対応が可能です。パッケージの中またはモジュールの隣にstaticというフォルダを作成するだけで、アプリケーションから/staticで利用できるようになります。
Dynamic web applications also need static files. That's usually where the CSS and JavaScript files are coming from. Ideally your web server is configured to serve them for you, but during development Flask can do that as well. Just create a folder called :file:`static` in your package or next to your module and it will be available at ``/static`` on the application.
静的ファイルに対応するURLを生成するには、特別な'static'というエンドポイント名を使用します:
To generate URLs for static files, use the special ``'static'`` endpoint name::
url_for('static', filename='style.css')
この例のファイルは、ファイルシステム上のstatic/style.cssに保管されている必要があります。
The file has to be stored on the filesystem as :file:`static/style.css`.
テンプレートの変換(Rendering) Rendering Templates
Pythonの中でHTMLを生成するのは楽しい作業ではなく、アプリケーションをセキュアに保つためにHTMLエスケープ処理を自分で行う必要があるために、実際にとても煩わしいものです。そのような理由から、FlaskはJinja2テンプレートエンジンを自動的に設定します。 Generating HTML from within Python is not fun, and actually pretty cumbersome because you have to do the HTML escaping on your own to keep the application secure. Because of that Flask configures the `Jinja2 <https://palletsprojects.com/p/jinja/>`_ template engine for you automatically.
テンプレートはどのタイプのテキストファイルを生成するときにも使用できます。Webアプリケーションでは、主にHTMLページを生成しますが、markdown、email用のplain text、その他の何でも生成できます。 Templates can be used to generate any type of text file. For web applications, you'll primarily be generating HTML pages, but you can also generate markdown, plain text for emails, any anything else.
HTML、CSS、およびその他のweb API用の参照情報は、MDN Web Docsを使ってください。 For a reference to HTML, CSS, and other web APIs, use the `MDN Web Docs`_.
テンプレートを変換するにはrender_template()メソッドを使用できます。あなたがしなければならないことは、テンプレート名と、キーワード引数としてテンプレートエンジンに渡したい変数とを提供するだけです。テンプレートをどのように変換するかの単純な例は以下のとおりです:
To render a template you can use the :func:`~flask.render_template` method. All you have to do is provide the name of the template and the variables you want to pass to the template engine as keyword arguments. Here's a simple example of how to render a template::
from flask import render_template

@app.route('/hello/')
@app.route('/hello/<name>')
def hello(name=None):
    return render_template('hello.html', name=name)
Flaskはテンプレートをtemplatesフォルダの中から探します。もしアプリケーションがモジュールなら、そのフォルダはモジュールの隣にあり、もしパッケージなら、そのフォルダは実際にはパッケージの中にあります:
Flask will look for templates in the :file:`templates` folder. So if your application is a module, this folder is next to that module, if it's a package it's actually inside your package:
ケース1: モジュール: **Case 1**: a module::
/application.py
/templates
    /hello.html
ケース2: パッケージ: **Case 2**: a package::
/application
    /__init__.py
    /templates
        /hello.html
テンプレートではJinja2テンプレートの力を全て使うことができます。より詳細な情報は公式のJinja2テンプレートのドキュメントを確認してください。 For templates you can use the full power of Jinja2 templates. Head over to the official `Jinja2 Template Documentation <https://jinja.palletsprojects.com/templates/>`_ for more information.
これはテンプレートの例です: Here is an example template:
<!doctype html>
<title>Hello from Flask</title>
{% if name %}
  <h1>Hello {{ name }}!</h1>
{% else %}
  <h1>Hello, World!</h1>
{% endif %}
テンプレートの中では、url_for()およびget_flashed_messages()関数と同様に、config、request、session、そしてg 1オブジェクトにもアクセスできます。
Inside templates you also have access to the :data:`~flask.Flask.config`, :class:`~flask.request`, :class:`~flask.session` and :class:`~flask.g` [#]_ objects as well as the :func:`~flask.url_for` and :func:`~flask.get_flashed_messages` functions.
継承を使うとテンプレートは非常に便利です。テンプレートがどのように働くか知りたいときはテンプレートの継承を確認してください。基本的にテンプレートの継承は各ページのある種の要素(ヘッダ、ナビゲーション、フッタのようなもの)を保持できるようにします。 Templates are especially useful if inheritance is used. If you want to know how that works, see :doc:`patterns/templateinheritance`. Basically template inheritance makes it possible to keep certain elements on each page (like header, navigation and footer).
自動エスケープが有効なので、もし(この例で)nameがHTMLを含んでいた場合は、自動的にエスケープされます。もし変数を信頼できて、それが安全なHTMLであると分かっている場合(例えばwikiのマークアップをHTMLへ変換するモジュールから来ている場合)は、Markupクラスを使うか、|safeフィルタ(訳注: ここでのフィルタはjinja2テンプレートエンジンの機能のひとつ)をテンプレートの中で使って、安全だと印を付けることができます。さらなる例はJinja2のドキュメントを確認してください。
Automatic escaping is enabled, so if ``name`` contains HTML it will be escaped automatically. If you can trust a variable and you know that it will be safe HTML (for example because it came from a module that converts wiki markup to HTML) you can mark it as safe by using the :class:`~markupsafe.Markup` class or by using the ``|safe`` filter in the template. Head over to the Jinja 2 documentation for more examples.
Markupがどう働くかの基礎的な紹介は以下のとおりです:
Here is a basic introduction to how the :class:`~markupsafe.Markup` class works::
>>> from markupsafe import Markup
>>> Markup('<strong>Hello %s!</strong>') % '<blink>hacker</blink>'
Markup('<strong>Hello <blink>hacker</blink>!</strong>')
>>> Markup.escape('<blink>hacker</blink>')
Markup('<blink>hacker</blink>')
>>> Markup('<em>Marked up</em> » HTML').striptags()
'Marked up » HTML'
Changelog
バージョン 0.5 で変更: 自動エスケープは全てのテンプレートで有効というわけではなくなっています。テンプレートが以下の拡張子であるときは、自動エスケープをトリガーします: .html、.htm、.xml、.xhtml。文字列から読み込まれたテンプレートでは、自動エスケープは無効になります。
- 1
gオブジェクトが何なのかあやふやですか?それは、独自のニーズのための情報を格納できるものです。より詳細な情報はgとFlaskでのSQLite 3の使用のドキュメントを見てください。 Unsure what that :class:`~flask.g` object is? It's something in which you can store information for your own needs. See the documentation for :class:`flask.g` and :doc:`patterns/sqlite3`.
リクエストデータへのアクセス Accessing Request Data
webアプリでは、クライアントがサーバへ送信したデータへ反応することが非常に重要です。Flaskでは、その情報(クライアントがサーバへ送信したデータ)はグローバルなrequestオブジェクト(訳注: モジュールのトップレベルで定義されていることとほぼ同じ意味合いで、Pythonで変数などのスコープや名前解決でLEGBルール(Local, Enclosing, Global, Built-in)と呼ばれるもののGlobalにあたるもの。例えば「from flask import request」をしておけば、その.pyファイル内でどこからでも、その時点での受信リクエスト情報を扱っているrequestオブジェクトにアクセスできる)で提供されます。もしPython経験が多少あるならば、そのオブジェクトがグローバルでありながらスレッドセーフでもあるように、Flaskがどうやって管理しているのか、不思議に思うかもしれません。その答えはコンテキストの局所的オブジェクト(context locals)です:
For web applications it's crucial to react to the data a client sends to the server. In Flask this information is provided by the global :class:`~flask.request` object. If you have some experience with Python you might be wondering how that object can be global and how Flask manages to still be threadsafe. The answer is context locals:
コンテキストの局所的オブジェクト(Context Locals) Context Locals
内部情報 Insider Information
もしcontext localsがどのように作用し、context localsを使ってどうやってテストできるかを理解したい場合は、このセクションを読み、そうでない場合は飛ばしてください。 If you want to understand how that works and how you can implement tests with context locals, read this section, otherwise just skip it.
いくつかのFlaskのオブジェクトはグローバルなオブジェクト(訳注: モジュールのトップレベルとほぼ同じ意味合いで、Pythonで変数などのスコープや名前解決でLEGBルール(Local, Enclosing, Global, Built-in)と呼ばれるもののGlobalにあたるもの。関数の引数やローカル変数、withブロックのasターゲットのように、特定の範囲・ブロックからだけアクセスできるオブジェクトと区別しています)ですが、普通の種類のものではありません。それらのオブジェクトは実際には、ある特定のコンテキストに対して局所的なオブジェクトへのプロキシになります。長ったらしい説明ですが、実際には、理解するのは非常に簡単です。 Certain objects in Flask are global objects, but not of the usual kind. These objects are actually proxies to objects that are local to a specific context. What a mouthful. But that is actually quite easy to understand.
コンテキストは(リクエストを)処理中のスレッドになると想像してください。リクエストがやって来て、webサーバが新規スレッド(もしくは別のなにか、スレッド以外で並列処理を扱える土台となるオブジェクト)を作成する決定をします。Flaskが内部のリクエスト処理を開始するとき、Flaskはそのときのスレッドが活動中(active)のコンテキストであることを理解し、そのときのFlaskアプリケーションおよびWSGI環境とそのコンテキスト(スレッド)との結び付け(bind)をします。Flaskは、あるアプリケーションを起動しながら別のアプリケーションは壊さないような(訳注: 作成・起動済みのflask.Flaskインスタンスを壊さずに、別のflask.Flaskインスタンスを作成・起動するような意味合い)、賢いやり方でそれを実施します。 Imagine the context being the handling thread. A request comes in and the web server decides to spawn a new thread (or something else, the underlying object is capable of dealing with concurrency systems other than threads). When Flask starts its internal request handling it figures out that the current thread is the active context and binds the current application and the WSGI environments to that context (thread). It does that in an intelligent way so that one application can invoke another application without breaking.
それでは、これはあなたにとって何を意味するのでしょうか?ユニットテストのようなことを行おうとしていない限り、基本的には完全に無視して構いません。(ユニットテストのようなことを行っているときは)requestオブジェクトが存在しないために、requestオブジェクトに依存しているコードが突然止まることに気付くでしょう。解決方法は、自分でrequestオブジェクトを作成してコンテキストに結び付けることです。ユニットテストのための最も簡単な解決方法は、コンテキストマネージャ(訳注: Pythonの仕様にある、with文と組み合わせて特別な処理をする仕組みで、ここの「コンテキスト」はFlaskのHTTPリクエストとは関係ないと思います)のtest_request_context()を使用することです。with文と組み合わせると、テスト用のrequestとやり取りできるように、テスト用requestとコンテキストとを結び付けます。以下はその例です:
So what does this mean to you? Basically you can completely ignore that this is the case unless you are doing something like unit testing. You will notice that code which depends on a request object will suddenly break because there is no request object. The solution is creating a request object yourself and binding it to the context. The easiest solution for unit testing is to use the :meth:`~flask.Flask.test_request_context` context manager. In combination with the ``with`` statement it will bind a test request so that you can interact with it. Here is an example::
from flask import request

with app.test_request_context('/hello', method='POST'):
    # now you can do something with the request until the
    # end of the with block, such as basic assertions:
    assert request.path == '/hello'
    assert request.method == 'POST'
別の可能なやり方は、WSGI環境全体をrequest_context()メソッドへ渡すことです(訳注: WSGIではWebサーバとWSGIアプリ間の主要なインタフェースに、サーバからWSGIアプリへ渡す、様々な情報を格納したdictオブジェクトがあり、WSGIの仕様であるPEP 3333ではそれを「environ」と呼んでいます。ここの「WSGI環境(WSGI environment)」は、おそらくWSGIサーバからWSGIアプリへ渡すdictを模擬したもののことだと思います)。
The other possibility is passing a whole WSGI environment to the :meth:`~flask.Flask.request_context` method::
with app.request_context(environ):
    assert request.method == 'POST'
リクエストオブジェクト The Request Object
requestオブジェクトはAPIセクションにドキュメントがあり、ここでは詳細は網羅しません(詳細はRequestを確認してください)。ここでは、最もよくある操作のいくつかについて概観します。まず最初に、requestオブジェクトをflaskモジュールからimportする必要があります:
The request object is documented in the API section and we will not cover it here in detail (see :class:`~flask.Request`). Here is a broad overview of some of the most common operations. First of all you have to import it from the ``flask`` module::
from flask import request
その時点のリクエストのメソッド(訳注: requestオブジェクトのメソッドではなく、HTTPのプロトコル上のメソッド)はmethod属性を使えば取得可能です。formのデータ(POSTまたはPUTリクエストで送信されるデータ)へアクセスするには、form属性を使用できます。以下は言及した2つの属性についての不足のない(どちらの用法も示した)例です:
The current request method is available by using the :attr:`~flask.Request.method` attribute. To access form data (data transmitted in a ``POST`` or ``PUT`` request) you can use the :attr:`~flask.Request.form` attribute. Here is a full example of the two attributes mentioned above::
@app.route('/login', methods=['POST', 'GET'])
def login():
    error = None
    if request.method == 'POST':
        if valid_login(request.form['username'],
                       request.form['password']):
            return log_the_user_in(request.form['username'])
        else:
            error = 'Invalid username/password'
    # the code below is executed if the request method
    # was GET or the credentials were invalid
    return render_template('login.html', error=error)
form属性にキーが存在しない場合はどうなるでしょうか?そのような場合は特別なKeyErrorを発生させます。それを標準のKeyErrorのようにcatchすることもできますし、そうしない場合には、代わりにHTTP 400 Bad Requestのエラーページが表示されます。従って多くの場面では、その問題を特に処理する必要はないでしょう。
What happens if the key does not exist in the ``form`` attribute? In that case a special :exc:`KeyError` is raised. You can catch it like a standard :exc:`KeyError` but if you don't do that, a HTTP 400 Bad Request error page is shown instead. So for many situations you don't have to deal with that problem.
URLの中(?key=valueの部分)で与えられるパラメータへのアクセスにはargs属性を使用できます:
To access parameters submitted in the URL (``?key=value``) you can use the :attr:`~flask.Request.args` attribute::
searchword = request.args.get('key', '')
ユーザはURLを変更することがあり(訳注: URLの中の?key=valueで与えられるパラメータの部分もユーザが勝手に変更することがあります)、そのたびに400 bad requestのページを表示することはユーザにとって親切ではないので、URLパラメータはgetでアクセス(訳注: getでアクセスしたときは、キーが存在しない場合でも例外は発生せず、2番目の引数が代わりに返ります)するか、KeyErrorをcatchすることを推奨します。
We recommend accessing URL parameters with `get` or by catching the :exc:`KeyError` because users might change the URL and presenting them a 400 bad request page in that case is not user friendly.
requestオブジェクトの全てのメソッドと属性のリストは、Requestクラスのドキュメントを確認してください。
For a full list of methods and attributes of the request object, head over to the :class:`~flask.Request` documentation.
ファイルのアップロード File Uploads
Flaskではアップロードされたファイルを容易に処理できます。自分のHTMLのformで、enctype="multipart/form-data"属性の設定だけは忘れず確実にしてください。そうしないと、そもそもブラウザがファイルを送信しないでしょう。
You can handle uploaded files with Flask easily. Just make sure not to forget to set the ``enctype="multipart/form-data"`` attribute on your HTML form, otherwise the browser will not transmit your files at all.
アップロードされたファイルはメモリ中かファイルシステムの一時的な場所に格納されます。それらのファイルはrequestオブジェクトのfiles属性を調べることでアクセスできます。アップロードされた各ファイルは、そのdictionaryに格納されます。それはPython標準のfileオブジェクトのように振る舞いますが、サーバのファイルシステムへそのファイルを格納できるようにするsave()メソッドも持っています。以下は、それがどのように働くかを示す簡単な例です:
Uploaded files are stored in memory or at a temporary location on the filesystem. You can access those files by looking at the :attr:`~flask.request.files` attribute on the request object. Each uploaded file is stored in that dictionary. It behaves just like a standard Python :class:`file` object, but it also has a :meth:`~werkzeug.datastructures.FileStorage.save` method that allows you to store that file on the filesystem of the server. Here is a simple example showing how that works::
from flask import request

@app.route('/upload', methods=['GET', 'POST'])
def upload_file():
    if request.method == 'POST':
        f = request.files['the_file']
        f.save('/var/www/uploads/uploaded_file.txt')
    ...
アップロードされる前にクライアント側でどのようなファイル名であったかを知りたい場合は、filename属性にアクセスできます。しかし、その値は偽装される可能性があり決して信頼はできないことは覚えておいてください。クライアント側のファイル名を使用してサーバ側でファイルを格納したい場合は、ファイル名をWerkzeugが提供するsecure_filename()関数に渡して通過させてください:
If you want to know how the file was named on the client before it was uploaded to your application, you can access the :attr:`~werkzeug.datastructures.FileStorage.filename` attribute. However please keep in mind that this value can be forged so never ever trust that value. If you want to use the filename of the client to store the file on the server, pass it through the :func:`~werkzeug.utils.secure_filename` function that Werkzeug provides for you::
from werkzeug.utils import secure_filename

@app.route('/upload', methods=['GET', 'POST'])
def upload_file():
    if request.method == 'POST':
        file = request.files['the_file']
        file.save(f"/var/www/uploads/{secure_filename(file.filename)}")
    ...
もっと良い例については、ファイルのアップロードのパターンを調べてください。 For some better examples, see :doc:`patterns/fileuploads`.
転送(Redirects)とエラー Redirects and Errors
ユーザを別のエンドポイントへリダイレクトするには、redirect()関数を使用します; リクエストを早い段階でエラーコードと一緒に異常終了させるには、abort()関数を使用します:
To redirect a user to another endpoint, use the :func:`~flask.redirect` function; to abort a request early with an error code, use the :func:`~flask.abort` function::
from flask import abort, redirect, url_for

@app.route('/')
def index():
    return redirect(url_for('login'))

@app.route('/login')
def login():
    abort(401)
    this_is_never_executed()
これは、ユーザをindexページからアクセスできないページ(401はアクセス拒否を意味します)へとリダイレクトするため、いくぶんポイントを捉えていない例ですが、上記の関数がどのように機能するかを示しています。 This is a rather pointless example because a user will be redirected from the index to a page they cannot access (401 means access denied) but it shows how that works.
標準設定では各エラーコードに対して白黒のエラーページを表示します。もしエラーページをカスタマイズしたい場合、errorhandler()デコレータを使用できます:
By default a black and white error page is shown for each error code. If you want to customize the error page, you can use the :meth:`~flask.Flask.errorhandler` decorator::
from flask import render_template

@app.errorhandler(404)
def page_not_found(error):
    return render_template('page_not_found.html'), 404
render_template()呼び出しの後ろにある404に注目してください。これは、そのページのステータスコードはnot foundを意味する404にするべきであることを、Flaskに伝えます。標準設定では200が想定されており、それは次のように翻訳されます: すべてうまく行きました。
Note the ``404`` after the :func:`~flask.render_template` call. This tells Flask that the status code of that page should be 404 which means not found. By default 200 is assumed which translates to: all went well.
より詳細はアプリケーションのエラーの処理を確認してください。 See :doc:`errorhandling` for more details.
レスポンスについて About Responses
view関数からの戻り値は自動的にresponseオブジェクトに変換されます。もし戻り値がstringの場合、stringをレスポンスのbodyに、ステータスコードを200 OKに、そしてmimeタイプをtext/htmlにしたresponseオブジェクトへ変換されます。もし戻り値がdictまたはlistの場合、responseを作成するためにjsonify()が呼び出されます。Flaskが(view関数の)戻り値をresponseへ変換するロジックは以下のとおりです:
The return value from a view function is automatically converted into a response object for you. If the return value is a string it's converted into a response object with the string as response body, a ``200 OK`` status code and a :mimetype:`text/html` mimetype. If the return value is a dict or list, :func:`jsonify` is called to produce a response. The logic that Flask applies to converting return values into response objects is as follows:
もし適切なタイプのresponseオブジェクトが返された場合は、それがviewから直接返されます。 If a response object of the correct type is returned it's directly returned from the view.
もしstringであれば、responseオブジェクトはそのデータと標準設定のパラメータとを使用して作成されます。 If it's a string, a response object is created with that data and the default parameters.
もしそれが文字列またはbyte列を返すiteratorもしくはgeneratorであれば、ストリーミングするレスポンスとして扱います。 If it's an iterator or generator returning strings or bytes, it is treated as a streaming response.
もしdictかlistであれば、responseオブジェクトは
jsonify()を使用して作成されます。 If it's a dict or list, a response object is created using :func:`~flask.json.jsonify`.もしtupleが返された場合は、tuple内のアイテムは追加情報を提供できます。そのようなtupleは
(response, status)、(response, headers)、または(response, status, headers)という形式でなければいけません。statusの値はステータスコードを上書きし、そしてheadersは追加ヘッダの値であるlistかdictionaryが可能です。 If a tuple is returned the items in the tuple can provide extra information. Such tuples have to be in the form ``(response, status)``, ``(response, headers)``, or ``(response, status, headers)``. The ``status`` value will override the status code and ``headers`` can be a list or dictionary of additional header values.もし上記のいずれも機能しない場合、戻り値は妥当なWSGIアプリケーションであるとFlaskは仮定し、それをresponseオブジェクトへ変換します。 If none of that works, Flask will assume the return value is a valid WSGI application and convert that into a response object.
もし結果となるresponseオブジェクトをviewの内側で捉えたい場合は、make_response()関数を使用できます。
If you want to get hold of the resulting response object inside the view you can use the :func:`~flask.make_response` function.
以下のようなviewがあると想像してください: Imagine you have a view like this::
from flask import render_template

@app.errorhandler(404)
def not_found(error):
    return render_template('error.html'), 404
必要なことは、make_response()でreturnの式を囲み、変更するためにresponseオブジェクトを取得し、それからその(変更後の)responseオブジェクトを返すだけです。
You just need to wrap the return expression with :func:`~flask.make_response` and get the response object to modify it, then return it::
from flask import make_response

@app.errorhandler(404)
def not_found(error):
    resp = make_response(render_template('error.html'), 404)
    resp.headers['X-Something'] = 'A value'
    return resp
JSONを使ったAPIs APIs with JSON
APIを書いているときによくあるレスポンスのフォーマットにJSONがあります。FlaskでそのようなAPIの作成を始めることは簡単です。もしdictかlistをviewから返した場合、それはJSONのレスポンスへ変換されます。
A common response format when writing an API is JSON. It's easy to get started writing such an API with Flask. If you return a ``dict`` or ``list`` from a view, it will be converted to a JSON response.
@app.route("/me")
def me_api():
    user = get_current_user()
    return {
        "username": user.username,
        "theme": user.theme,
        "image": url_for("user_image", filename=user.image),
    }

@app.route("/users")
def users_api():
    users = get_all_users()
    return [user.to_json() for user in users]
これは、サポートされているどのJSONのデータタイプもシリアライズ(訳注: Python内部で処理できるデータ形式のオブジェクトから、文字列やバイト列のように、階層を持たず、頭から順番に読み込んで処理できるデータ形式へ変換するような意味合い)する、jsonify()関数へデータを渡すショートカットです。これは、dictもしくはlist内の全てのデータはJSONでシリアライズ可能である必要があることを意味します。
This is a shortcut to passing the data to the :func:`~flask.json.jsonify` function, which will serialize any supported JSON data type. That means that all the data in the dict or list must be JSON serializable.
データベースのモデルのような複雑なタイプでは、データを正当なJSONのタイプへ最初に変換するシリアライズのライブラリを使いたくなるでしょう。もっと複雑な応用もサポートする、コミュニティで保守されているシリアライズのライブラリやFlask APIの拡張もたくさんあります。 For complex types such as database models, you'll want to use a serialization library to convert the data to valid JSON types first. There are many serialization libraries and Flask API extensions maintained by the community that support more complex applications.
セッション Sessions
requestオブジェクトに加えて、ユーザに特有の情報をあるリクエストから次のリクエストへと格納できるようにする、sessionと呼ばれる2番目のオブジェクトもあります。これはクッキー上に実装されていて、クッキーに暗号学的な署名をします。これが意味することは、ユーザは自分のクッキーの内容を見ることはできますが、署名に使われた秘密の鍵を知らないかぎり、変更はできないということです。
In addition to the request object there is also a second object called :class:`~flask.session` which allows you to store information specific to a user from one request to the next. This is implemented on top of cookies for you and signs the cookies cryptographically. What this means is that the user could look at the contents of your cookie but not modify it, unless they know the secret key used for signing.
セッションを使用するためには、秘密の鍵を設定しなければなりません。セッションがどのように働くかは、以下のとおりです: In order to use sessions you have to set a secret key. Here is how sessions work::
from flask import session

# Set the secret key to some random bytes. Keep this really secret!
app.secret_key = b'_5#y2L"F4Q8z\n\xec]/'

@app.route('/')
def index():
    if 'username' in session:
        return f'Logged in as {session["username"]}'
    return 'You are not logged in'

@app.route('/login', methods=['GET', 'POST'])
def login():
    if request.method == 'POST':
        session['username'] = request.form['username']
        return redirect(url_for('index'))
    return '''
        <form method="post">
            <p><input type=text name=username>
            <p><input type=submit value=Login>
        </form>
    '''

@app.route('/logout')
def logout():
    # remove the username from the session if it's there
    session.pop('username', None)
    return redirect(url_for('index'))
良い秘密の鍵の生成方法 How to generate good secret keys
秘密の鍵はできるだけでたらめ(random)なものにするべきです。暗号学的にでたらめであるデータを生成する装置に基づいた、非常にでたらめなデータを生成する方法がオペレーティングシステムにはあります。手早くFlask.secret_key(もしくはSECRET_KEY)の値を生成するには、以下のコマンドを使用してください:
A secret key should be as random as possible. Your operating system has ways to generate pretty random data based on a cryptographic random generator. Use the following command to quickly generate a value for :attr:`Flask.secret_key` (or :data:`SECRET_KEY`)::
$ python -c 'import secrets; print(secrets.token_hex())'
'192b9bdd22ab9ed4d12e236c78afcb9a393ec15f71bbf5dc987d54727823bcbf'
クッキーに基づいたセッションについての注意: Flaskはsessionオブジェクトに置かれた値を取り上げ、クッキーへシリアライズ(訳注: Python内部で処理できるデータ形式のオブジェクトから、文字列やバイト列のように、階層を持たず、頭から順番に読み込んで処理できるデータ形式へ変換するような意味合い)します。もしも(sessionで)ある値が複数のリクエストを跨いでは持続をしていないことが見つかり、実際にクッキーは有効であり、そして明確なエラーメッセージを得られないときは、ページのレスポンスにあるクッキーのサイズをチェックし、webブラウザによってサポートされているサイズと比較してください。 A note on cookie-based sessions: Flask will take the values you put into the session object and serialize them into a cookie. If you are finding some values do not persist across requests, cookies are indeed enabled, and you are not getting a clear error message, check the size of the cookie in your page responses compared to the size supported by web browsers.
クライアント側に基づいた標準的なセッションに加えて、もしサーバ側で代わりにセッションを処理したい場合、これをサポートするFlask拡張がいくつかあります。 Besides the default client-side based sessions, if you want to handle sessions on the server-side instead, there are several Flask extensions that support this.
メッセージのフラッシュ表示 Message Flashing
良いアプリケーションおよびユーザインタフェースとは、すべてフィードバック次第です。もしユーザが十分なフィードバックを得られない場合、おそらくアプリケーションを嫌いになって終わりです。Flaskはフラッシュ表示の仕組み(flashing system)によって、ユーザへフィードバックを与える非常にシンプルな方法を提供します。フラッシュ表示の仕組みは、リクエストの最後にメッセージを記録し、次の(ただ次だけの)リクエストでアクセスできるようにします。これは、普通はそのメッセージを表示するレイアウトのテンプレートと組み合わされます。 Good applications and user interfaces are all about feedback. If the user does not get enough feedback they will probably end up hating the application. Flask provides a really simple way to give feedback to a user with the flashing system. The flashing system basically makes it possible to record a message at the end of a request and access it on the next (and only the next) request. This is usually combined with a layout template to expose the message.
メッセージをフラッシュ表示させるにはflash()メソッドを使用し、メッセージを捉えるには、テンプレート中でも利用可能なget_flashed_messages()が使用できます。不足のない(どちらの用法も示した)例についてはメッセージのフラッシュ表示(Message Flashing)を調べてください。
To flash a message use the :func:`~flask.flash` method, to get hold of the messages you can use :func:`~flask.get_flashed_messages` which is also available in the templates. See :doc:`patterns/flashing` for a full example.
ログ機能(Logging) Logging
Changelog
バージョン 0.3 で追加.
ときには、適切であるべきなのに実際にはそうではないデータを処理する状況におかれるかもしれません。例えば、明らかに適切でない形式のHTTPリクエストをサーバへ送信するクライアント側のコードがあるかもしれません。これは、ユーザのデータ改ざんや、クライアントのコードの失敗によって引き起こされるかもしれません。その状況では殆どの場合は400 Bad Requestを返せば大丈夫ですが、ときにはそれでは通用せず、コードを動かし続けなければならないことがあります。
Sometimes you might be in a situation where you deal with data that should be correct, but actually is not. For example you may have some client-side code that sends an HTTP request to the server but it's obviously malformed. This might be caused by a user tampering with the data, or the client code failing. Most of the time it's okay to reply with ``400 Bad Request`` in that situation, but sometimes that won't do and the code has to continue working.
そのような状況でもまだ、起きてしまったそのようなうさんくさい何かをログしたいことがあるかもしれません(You may still want to log that something fishy happened)。これはloggerを重宝する状況です。Flask 0.3以降は、loggerが使用できるように事前設定されています。 You may still want to log that something fishy happened. This is where loggers come in handy. As of Flask 0.3 a logger is preconfigured for you to use.
以下はログ呼び出しのいくつかの例です: Here are some example log calls::
app.logger.debug('A value for debugging')
app.logger.warning('A warning occurred (%d apples)', 42)
app.logger.error('An error occurred')
付与されているloggerはPython標準のロギングのLoggerなので、さらなる情報は公式のloggingのドキュメントを確認してください。
The attached :attr:`~flask.Flask.logger` is a standard logging :class:`~logging.Logger`, so head over to the official :mod:`logging` docs for more information.
アプリケーションのエラーの処理を調べてださい。 See :doc:`errorhandling`.
WSGIミドルウェア内でのフック Hooking in WSGI Middleware
自分のFlaskアプリケーションにWSGIミドルウェアを追加するには、アプリケーションのwsgi_app属性を包み込みます(wrap)。例えば、Nginxの背後で走らせるためにWerkzeugのProxyFixミドルウェアを適用するには以下のようにします:
To add WSGI middleware to your Flask application, wrap the application's ``wsgi_app`` attribute. For example, to apply Werkzeug's :class:`~werkzeug.middleware.proxy_fix.ProxyFix` middleware for running behind Nginx:
from werkzeug.middleware.proxy_fix import ProxyFix
app.wsgi_app = ProxyFix(app.wsgi_app)
appの代わりにapp.wsgi_appを包み込むことは、appはミドルウェアではなく変わらず自分のFlaskアプリケーションを指し、引き続き直接appを使用して(Flaskアプリケーションを)設定できることを意味します。
Wrapping ``app.wsgi_app`` instead of ``app`` means that ``app`` still points at your Flask application, not at the middleware, so you can continue to use and configure ``app`` directly.
Flask拡張の使用 Using Flask Extensions
(Flask)拡張は、よくあるタスクを達成する手助けをするパッケージです。例えば、Flask-SQLAlchemyはSQLAlchemyのサポートを提供し、シンプルかつ容易にSQLAlchemyをFlaskと一緒に使用できるようにします。 Extensions are packages that help you accomplish common tasks. For example, Flask-SQLAlchemy provides SQLAlchemy support that makes it simple and easy to use with Flask.
Flask拡張についてさらには、Flask拡張(Extensions)を調べてください。 For more on Flask extensions, see :doc:`extensions`.
webサーバへのデプロイ Deploying to a Web Server
新しいFlaskアプリをデプロイする準備ができましたか?本番環境への展開(Deployment to Production)へ進んでください。 Ready to deploy your new Flask app? See :doc:`deploying/index`.